Configure SIPREC auto-failover for a direct CFS-MiaRec connection
Info
This article describes the required steps to configure auto-failover for SIPREC recording in scenario when Metaswitch CFS directly communicates to MiaRec recorder. If Perimeta SBC is used as a SIP Proxy between CFS and MiaRec, then check the appropriate guide.
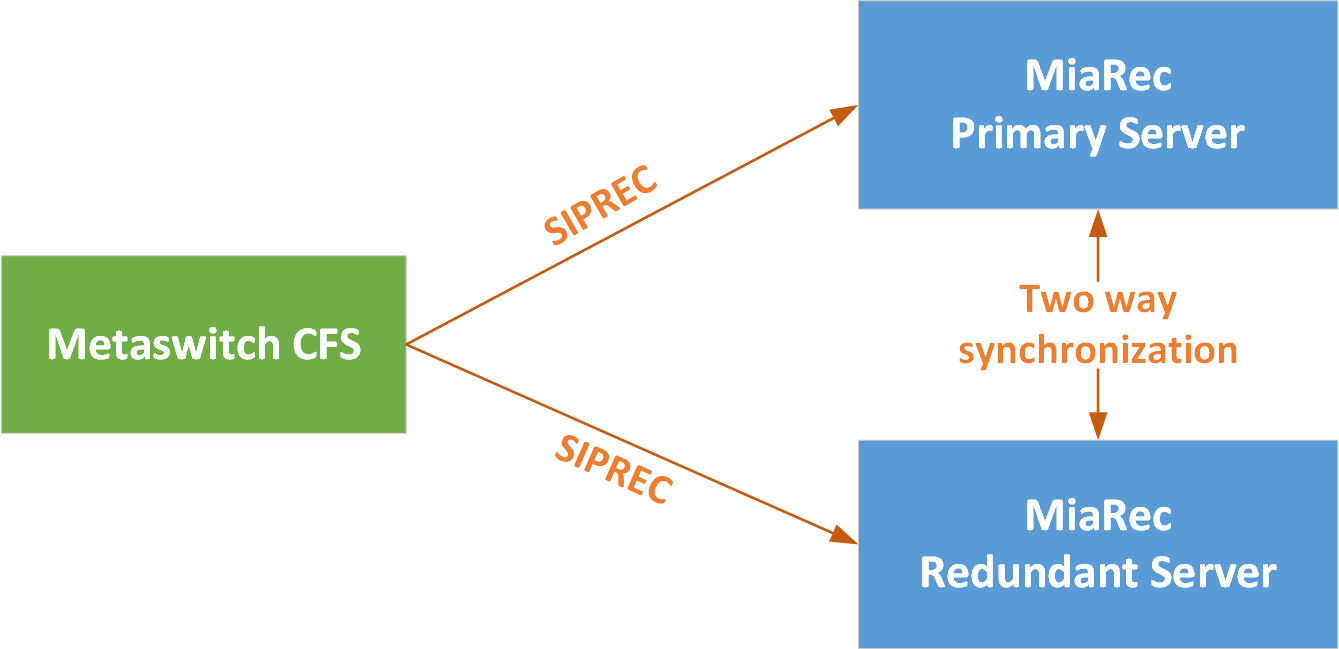
A network topology is shown in the following diagram.
Here, Metaswitch CFS communicates with two MiaRec recordings servers using SIPREC protocol. DNS SRV records are used to configure priority of the recording servers.
Step 1. Configure DNS SRV records
Create two A-records on your DNS server. Each of records should point to the corresponding MiaRec server:
| Alias | Record Type | Points to | Description |
|---|---|---|---|
| miarec1.your-domain.com | A record | x.x.x.x | This A-record should point to ip-address of the primary MiaRec server |
| miarec2.your-domain.com | A record | y.y.y.y | This A-record should point to ip-address of the secondary MiaRec server |
Create DNS SRV records on your DNS server for both UDP and TCP protocols:
TCP records:
# _service._proto.name.                    TTL   class   SRV   priority  weight    port   target.
_sip._tcp.miarec-siprec.your-domain.com.   1800  IN      SRV   10        50        5080   miarec1.your-domain.com.
_sip._tcp.miarec-siprec.your-domain.com.   1800  IN      SRV   20        50        5080   miarec2.your-domain.com.
UDP records:
# _service._proto.name.                   TTL   class   SRV   priority  weight    port   target.
_sip._udp.miarec-siprec.your-domain.com.  1800  IN      SRV   10        50        5080   miarec1.your-domain.com.
_sip._udp.miarec-siprec.your-domain.com.  1800  IN      SRV   20        50        5080   miarec2.your-domain.com.
In this example, we define DNS SRV name miarec-siprec.your-domain.com that points to two MiaRec servers. We use different priority values for MiaRec servers, i.e. miarec1 has priority 10 and miarec2 has priority 20. The miarec1 server will be used as a primary server. Metaswitch CFS will send 100% of SIPREC traffic to miarec1 unless this server is not reachable. If miarec1 is unavailable, Metaswitch CFS will send SIPREC traffic to miarec2 as a failover mechanism.
Why do we need both TCP and UDP records for SIPREC?
In some scenarios, Metaswitch may send SIP re-INVITE packet using TCP protocol even if the original INVITE was sent out using UDP. That's why we need to enable both TCP and UDP protocols.
Step 2. Configure SIP Binding for MiaRec on Metaswitch CFS
- In MetaView Explorer, select Object tree and views. Expand the tree until you can see the Network Element object corresponding to your MetaSphere CFS. Expand this object.
- Locate and expand the Controlled Networks object, then the Configured SIP Bindings object below it.
- Locate the SIP Binding previously created for MiaRec recorder (or create new one).
- Fill in the fields as follows. Any fields not listed below can be left with their default values.
- Name: fill in a name that will help you to associate this binding with the recording server. For example, "MiaRec recorder"
- Usage: set to Application Server.
- Use DN for identification: set to True.
- SIP authentication required: set to False.
- IP address match required: set to True.
- Contact address scheme: set to Domain name SRV lookup (auto fail-over).
- Contact domain name: set to the DNS SRV domain name of the MiaRec recording servers. (
miarec-siprec.your-domain.comin our example). - Proxy IP address: leave blank as we are not using proxy for SIPREC in this setup
- Trusted: set to True.
- Media Gateway model: select the model that you imported earlier in this procedure.
- Maximum call appearances: set this to the maximum concurrent calls for the recording service. Enabling Call Recording on large numbers of lines will increase the resources used by the service, particularly Media Gateway resources. Ensure that you have enough capacity to handle the expected level of recorded calls. If the MiaRec recorder server is located in a separate network, make sure that appropriate bandwidth is available for the the anticipated recording data network traffic.
- Poll peer device: set to True.
Info
Important! This configuration assumes that 1) CFS can resolve domain names, i.e. DNS server(s) is properly configured in CFS and 2) CFS can communicate directly to MiaRec server, i.e. firewall/router, if any, is configured properly to allow such direct communication.
Step 3. Test auto-failover
- Make a test call.
- Verify if such call is recorded by the primary MiaRec server. If no calls are recorded, then check the Troubleshooting section below.
- Complete the call.
-
Simulate a failure of the primary server by stopping the recording service via SSH console:
service miarec stop5. Make another test call. 6. Verify if such call is recorded by the secondary MiaRec server. If no calls are recorded, then check the Troubleshooting section below. 7. Restore the recording service on the primary server:service miarec start8. Make another test call. 9 Verify if such call is recorded again by the primary MiaRec server. Note, it may take a few minutes before CFS begins sending SIPREC traffic to the primary server after its restoration.
Troubleshooting
In case of issues, check the following sources:
- Check the alarms for MiaRec SIP Binding in MetaView Explorer.
- Check the SIP messages call flow in SAS trace. Verify if CFS sends SIP INVITE to the corresponding MiaRec server. For example, if the first server is down, CFS should try to send SIP INVITE to the secondary server rather than trying to reach the primary one.
- Enable trace in MiaRec under Administration -> Maintenance -> Troubleshooting and check the collected trace file.