Increase/expand an XFS filesystem in RHEL 7 / CentOS 7
This guide will explain how to grow an XFS filesystem on VMWare Virtual Machine without a reboot.
Verify if your server has XFS file system (you should see "xfs" in the Type column):
# df -Th

Filesystem          Type      Size  Used Avail Use% Mounted on
/dev/mapper/cl-root xfs       143G   27G  117G  19% /
devtmpfs            devtmpfs  908M     0  908M   0% /dev
tmpfs               tmpfs     918M  4.0K  918M   1% /dev/shm
tmpfs               tmpfs     918M   90M  828M  10% /run
tmpfs               tmpfs     918M     0  918M   0% /sys/fs/cgroup
/dev/sda1           xfs      1014M  184M  831M  19% /boot
/dev/mapper/cl-home xfs       8.0G   33M  8.0G   1% /home
tmpfs               tmpfs     184M     0  184M   0% /run/user/0
To increase the disk size of Virtual Machine, you need to do 2 major steps:
- First, you need to increase the disk's size in your vSphere Client or through the CLI. This will increase the "hardware" disk that your Virtual Machine can see.
- Then, you need to utilize that extra space by partitioning it.
Step 1. Increase a hardware disk size in VMWare ESXi host
Checking if you can extend the current disk or need to add a new one
This is rather important step, because a disk that has been partitioned in 4 primary partitions already can not be extended any more. To check this, log into your server and run fdisk -l at the command line.
# fdisk -l

Disk /dev/sda: 137.4 GB, 137438953472 bytes, 268435456 sectors
Units = sectors of 1 * 512 = 512 bytes
Sector size (logical/physical): 512 bytes / 512 bytes
I/O size (minimum/optimal): 512 bytes / 512 bytes
Disk label type: dos
Disk identifier: 0x000aa739

Device Boot      Start         End      Blocks   Id  System
/dev/sda1   *        2048     2099199     1048576   83  Linux
/dev/sda2         2099200   268435455   133168128   8e  Linux LVM
If it looks like that, with only 2 partitions, you can safely extend the current hard disk in the Virtual Machine.
However, if it looks like this:
# fdisk -l

Disk /dev/sda: 187.9 GB, 187904819200 bytes
255 heads, 63 sectors/track, 22844 cylinders
Units = cylinders of 16065 * 512 = 8225280 bytes

Device Boot      Start         End      Blocks   Id  System
/dev/sda1   *           1          25      200781   83  Linux
/dev/sda2              26        2636    20972857+  8e  Linux LVM
/dev/sda3            2637       19581   136110712+  8e  Linux LVM
/dev/sda4           19582       22844    26210047+  8e  Linux LVM
It will show you that there are already 4 primary partitions on the system, and you need to add a new Virtual Disk to your Virtual Machine. You can still use that extra Virtual Disk to increase your LVM size, so don't worry.
Adding diskspace to Virtual Machine
Using VMWare vSphere Client, open the properties of the virtual machine and increase the Provisioned Size.
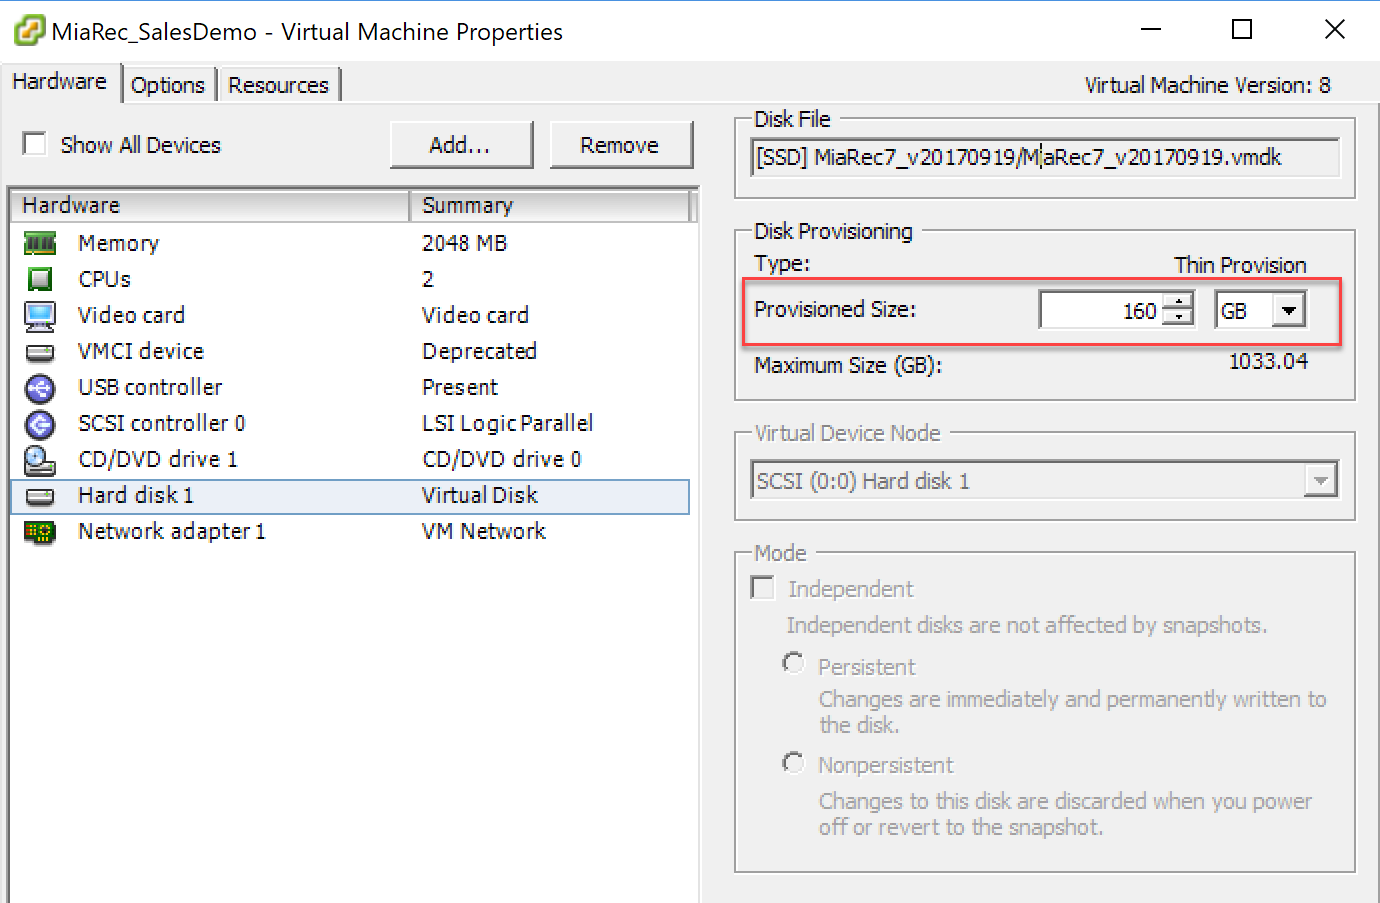
If the "Provisioned Size" area (top right corner) is greyed out, consider turning off the VM first (if it does not allow "hot adding" of disks/sizes), and check if you have any snapshots made of that VM. You can not increase the disk size, as long as there are available snapshots.
Alternatively, if you already have 4 primary paritions, you can also choose "Add..." to add new Hardware "Virtual Disk" to your VM, with the desired extra space.
Step 2. Extend partition within a Virtual Machine
Partitioning the unallocated space: if you've increased the disk size
Once you've changed the disk's size in VMware, boot up your VM again if you had to shut it down to increase the disk size in vSphere. If you've rebooted the server, you won't have to rescan your SCSI devices as that happens on boot. If you did not reboot your server, rescan your SCSI devices as such.
First, check the name(s) of your scsi devices.
# ls /sys/class/scsi_device/
1:0:0:0  2:0:0:0
Then rescan the scsi bus. On this machine, we have two devices. Execute the following commands to re-scan them. Below you can replace the '1:0:0:0' with the actual scsi bus name found with the previous command. Each colon is prefixed with a slash, which is what makes it look weird.
# echo 1 > /sys/class/scsi_device/1\:0\:0\:0/device/rescan
# echo 1 > /sys/class/scsi_device/2\:0\:0\:0/device/rescan
That will rescan the current scsi bus and the disk size that has changed will show up.
Execute fdisk -l to check if new size if visible to the Virtual Machine:
# fdisk -l

Disk /dev/sda: 171.8 GB, 171798691840 bytes, 335544320 sectors
Partitioning the unalloced space: if you've added a new disk
If you've added a new disk on the server, the actions are similar to those described above. But instead of rescanning an already existing scsi bus like show earlier, you have to rescan the host to detect the new scsi bus as you've added a new disk.
# ls  /sys/class/scsi_host/
total 0
drwxr-xr-x  3 root root 0 Feb 13 02:55 .
drwxr-xr-x 39 root root 0 Feb 13 02:57 ..
drwxr-xr-x  2 root root 0 Feb 13 02:57 host0
Your host device is called host0, rescan it as such:
# echo "- - -" > /sys/class/scsi_host/host0/scan
It won't show any output, but running fdisk -l will show the new disk.
Create the new partition
Once the rescan is done (should only take a few seconds), you can check if the extra space can be seen on the disk.
# fdisk -l

Disk /dev/sda: 171.8 GB, 171798691840 bytes, 335544320 sectors
Units = sectors of 1 * 512 = 512 bytes
Sector size (logical/physical): 512 bytes / 512 bytes
I/O size (minimum/optimal): 512 bytes / 512 bytes
Disk label type: dos
Disk identifier: 0x000aa739

Device Boot      Start         End      Blocks   Id  System
/dev/sda1   *        2048     2099199     1048576   83  Linux
/dev/sda2         2099200   268435455   133168128   8e  Linux LVM
Using fdisk, create a new partition on the /dev/sda device. Enter n, to create a new partition:
# fdisk /dev/sda
Welcome to fdisk (util-linux 2.23.2).

Changes will remain in memory only, until you decide to write them.
Be careful before using the write command.


Command (m for help): n
Now choose p to create a new primary partition. Please note, your system can only have 4 primary partitions on this disk! If you've already reached this limit, create an extended partition.
Partition type:
   p   primary (2 primary, 0 extended, 2 free)
   e   extended
Select (default p): p
Choose your partition number. Since we already had /dev/sda1 and /dev/sda2, the logical number would be 3.
Partition number (3,4, default 3): 3
Choose the first and last sectors for new partition, if you hit ENTER, then by default new partition will use all available disk space.
First sector (268435456-335544319, default 268435456): <ENTER>
Using default value 268435456
Last sector, +sectors or +size{K,M,G} (268435456-335544319, default 335544319): <ENTER>
Using default value 335544319
Partition 3 of type Linux and of size 32 GiB is set
Now type t to change the partition type. When prompted, enter the number of the partition you've just created in the previous steps. When you're asked to enter the "Hex code", enter 8e, and confirm by hitting enter.
Command (m for help): t
Partition number (1-3, default 3): 3
Hex code (type L to list all codes): 8e
Changed type of partition 'Linux' to 'Linux LVM'
Once you get back to the main command within fdisk, type w to write your partitions to the disk. You'll get a message about the kernel still using the old partition table, and to reboot to use the new table. The reboot is not needed as you can also rescan for those partitions using partprobe.
Command (m for help): w
The partition table has been altered!

Calling ioctl() to re-read partition table.

WARNING: Re-reading the partition table failed with error 16: Device or resource busy.
The kernel still uses the old table. The new table will be used at
the next reboot or after you run partprobe(8) or kpartx(8)
Syncing disks.
Run the following to scan for the newly created partition:
# partprobe -s
/dev/sda: msdos partitions 1 2 3
If that does not work for you, you can try to use "partx" to rescan the device and add the new partitions. In the command below, change /dev/sda to the disk on which you've just added a new partition.
# partx -v -a /dev/sda
If that still does not show you the newly created partition for you to use, you have to reboot the server. Afterwards, you can see the newly created partition with fdisk.
# fdisk -l

Disk /dev/sda: 171.8 GB, 171798691840 bytes, 335544320 sectors
Units = sectors of 1 * 512 = 512 bytes
Sector size (logical/physical): 512 bytes / 512 bytes
I/O size (minimum/optimal): 512 bytes / 512 bytes
Disk label type: dos
Disk identifier: 0x000aa739

Device Boot      Start         End      Blocks   Id  System
/dev/sda1   *        2048     2099199     1048576   83  Linux
/dev/sda2         2099200   268435455   133168128   8e  Linux LVM
/dev/sda3       268435456   335544319    33554432   8e  Linux LVM
Extend the Logical Volume with the new partition
Now, create the physical volume as a basis for your LVM. Please replace /dev/sda3 with the newly created partition.
# pvcreate /dev/sda3

Physical volume "/dev/sda3" successfully created
Now find out how your Volume Group is called. In our example, it has name cl
#  vgdisplay
--- Volume group ---
VG Name               cl
...
Let's extend that Volume Group by adding the newly created physical volume to it.
# vgextend cl /dev/sda3

Volume group "cl" successfully extended
With pvscan, we can see our newly added physical volume, and the usable space (32GB in this case).
# pvscan
PV /dev/sda2   VG cl              lvm2 [127.00 GiB / 4.00 MiB free]
PV /dev/sda3   VG cl              lvm2 [32.00 GiB / 32.00 GiB free]
Total: 2 [158.99 GiB] / in use: 2 [158.99 GiB] / in no VG: 0 [0   ]
Now we can extend Logical Volume (as opposed to the Physical Volume we added to the group earlier).
First, check the logical volumes available on system using command ls /dev/VolGroupName (in our example volume group name is cl):
# ls /dev/cl
home  root  swap
We have home, root and swap logical volumes. To extend the logical volume root, execute command:
# lvextend /dev/cl/root /dev/sda3
Size of logical volume cl/root changed from 111.00 GiB (28415 extents) to 142.99 GiB (36606 extents).
Logical volume cl/root successfully resized.
All that remains now, is to resize the file system to the volume group, so we can use the space. Execute xfs_growfs command as shown below (replace cl-root with the name of volume group on your system).
# xfs_growfs /dev/mapper/cl-root
meta-data=/dev/mapper/cl-root    isize=512    agcount=4, agsize=7274240 blks
         =                       sectsz=512   attr=2, projid32bit=1
         =                       crc=1        finobt=0 spinodes=0
data     =                       bsize=4096   blocks=29096960, imaxpct=25
         =                       sunit=0      swidth=0 blks
naming   =version 2              bsize=4096   ascii-ci=0 ftype=1
log      =internal               bsize=4096   blocks=14207, version=2
         =                       sectsz=512   sunit=0 blks, lazy-count=1
realtime =none                   extsz=4096   blocks=0, rtextents=0
data blocks changed from 29096960 to 37484544
Execute df -h to confirm that new disk size is available to the Virtual Machine.
# df -h
Filesystem           Size  Used Avail Use% Mounted on
/dev/mapper/cl-root  143G   27G  117G  19% /
devtmpfs             908M     0  908M   0% /dev
tmpfs                918M  4.0K  918M   1% /dev/shm
tmpfs                918M   89M  830M  10% /run
tmpfs                918M     0  918M   0% /sys/fs/cgroup
/dev/sda1           1014M  184M  831M  19% /boot
/dev/mapper/cl-home  8.0G   33M  8.0G   1% /home
tmpfs                184M     0  184M   0% /run/user/0