Metaswitch SIPREC configuration
This article explains how to set up MiaRec SIPREC call recording on the Metaswitch CFS platform.
Requirements:
- MetaSwitch CFS v.9.0.10 or higher
SIPREC recording interface is supported in Metaswitch CFS starting from v.9.0.10.
Hint
Service impact
The step to enable call recording on MetaSphere CFS, by modifying the global Application Servers object, requires you to disable this object briefly in order to make configuration changes. This means that any other services provided to MetaSphere CFS by Application Servers will be unavailable for a short period, typically no more than five minutes. It is recommended to do this step during a maintenance window or when the call usage is low.
Apart from a brief outage in services provided to MetaSphere CFS by Application Servers, as described above, this procedure has no impact on service.
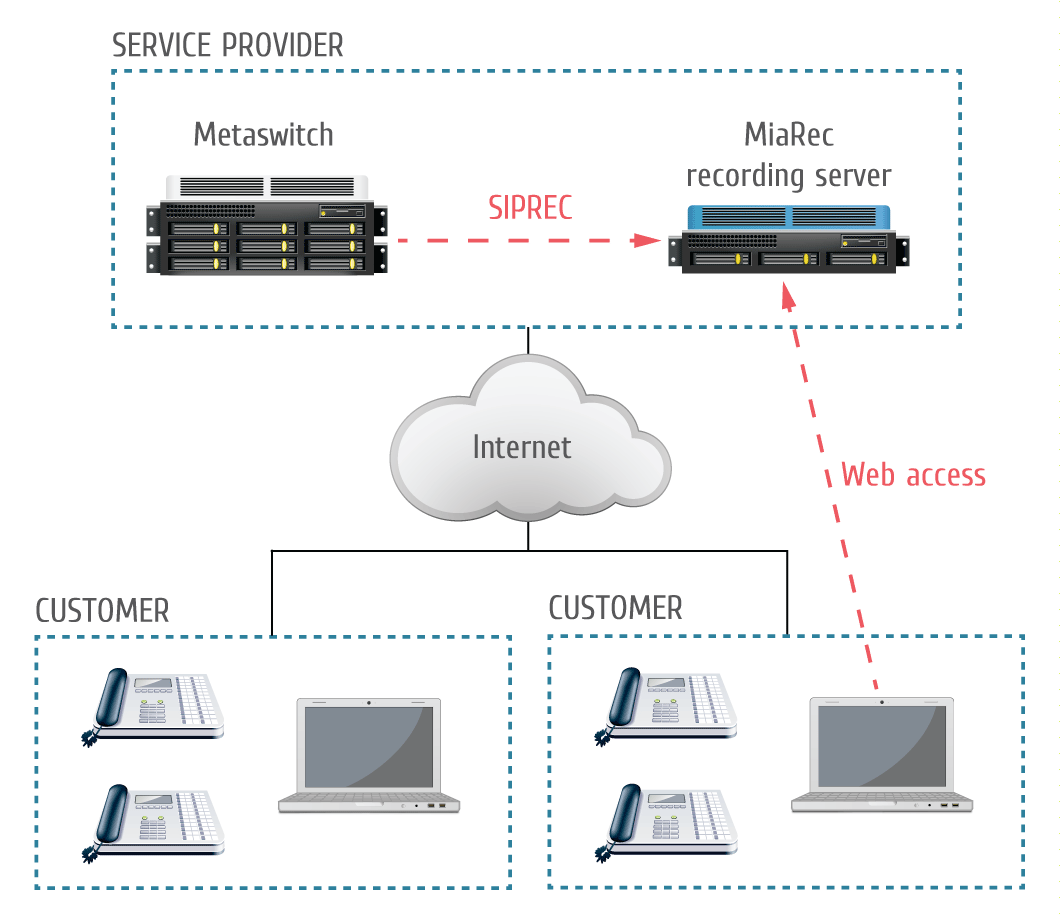
Network architecture
Metaswitch system uses the established SIPREC link to send call details (caller/called phone number, service provider id etc) and audio RTP stream to MiaRec recording server.
Step 1. Configure SIPREC recording interface in MiaRec
- Using MiaRec web portal, navigate to Administration -> System -> Recording Interfaces.
- Click the Configure button for SIPREC interface
- Fill in the fields as follows:
- Enable: checked (True)
- Signaling UDP port: the desired port for SIP signaling. By default, MiaRec uses port 5080 for SIPREC, but you can change it to any other value.
- Signaling TCP port: should be the same as UDP. Metaswitch CFS may send SIP packets towards to MiaRec using either UDP or TCP based on varios criteria, for example, it may choose TCP for large packets and UDP for smaller packets. So, both TCP and UDP listening ports should be enabled in MiaRec and both these ports should have the same value.
- Public ip-address: specify the public ip-address of the MiaRec server if you use port forwarding for SIPREC traffic.
- Use default values for other fields.
Hint
Update firewall settings. If you change SIPREC signaling port, then you need to update the firewall settings on the MiaRec server.
Step 2. Import the Remote Media Gateway Model used for the MiaRec recording server
- Download rmgm_Miarec_521149_9.3_v1.txt and save it to the MetaView User's home directory on the computer where you are running MetaView Explorer.
- Log in to MetaView Explorer.
- Select Object tree and views. Expand the tree until you can see the Network Element object corresponding to your MetaSphere CFS.
- Locate and expand the Controlled Networks object, then the Remote Media Gateway Models object below it.
- In the Import - file field, type the name of the Remote Media Gateway Model import file. Click apply to confirm your changes.
- Click on the import button to import the file.
The Import - status field should change to In progress and then to Succeeded to indicate that the configuration has been imported successfully.
If the status does not change to Succeeded, then look at the Import - log correlator field, and click on the go to log button next to this field to jump to the MetaView Explorer log viewer window, which shows a summary log describing the import action you have just taken. If there were problems with the import, you can follow the links within the log viewer to see the earlier logs relating to this problem. Take any action recommended by these logs and retry the import.
Step 3. Create the Configured SIP Binding
- In MetaView Explorer, select Object tree and views. Expand the tree until you can see the Network Element object corresponding to your MetaSphere CFS. Expand this object.
- Locate and expand the Controlled Networks object, then the Configured SIP Bindings object below it.
- Click on the add sub-component button and choose Configured SIP Binding.
- Fill in the fields as follows. Any fields not listed below can be left with their default values.
Info
When using two MiaRec servers in HA configuration (redundancy and auto-failover), check SIPREC auto-failover configuration.
- Name: fill in a name that will help you to associate this binding with the recording server. For example, "MiaRec recorder"
- Usage: set to Application Server
- Use DN for identification: set to True
- SIP authentication required: set to False
- IP address match required: set to True
- Contact address scheme: set to IP address and port when using a single MiaRec server or Domain name SRV lookup (auto fail-over) when using two MiaRec servers in HA configuration.
- Contact IP address and Contact IP port: set to the address and port of the MiaRec recording server when the "Contact address scheme" is "IP address and port"
- Contact domain name: set to the DNS SRV domain name of the MiaRec recording servers when the "Contact address scheme" is "DNS SRV".
- Proxy IP address and Proxy IP port: set to the IP address and port used to communicate with the proxy, or leave blank if a proxy is not being used. We recommend to leave this this option empty when both CFS and MiaRec are in the same network. See Step 10 for details.
- Trusted: set to True
- Media Gateway model: select the model that you imported earlier in this procedure
- Maximum call appearances: set this to the maximum concurrent calls for the recording service. Enabling Call Recording on large numbers of lines will increase the resources used by the service, particularly Media Gateway resources. Ensure that you have enough capacity to handle the expected level of recorded calls. If the MiaRec recorder server is located in a separate network, make sure that appropriate bandwidth is available for the the anticipated recording data network traffic.
-
Poll peer device: set to True.
-
Click apply to confirm your changes.
Step 4. Create the Application Server
- In MetaView Explorer, navigate to Call Feature Server -> Call Services -> Global Application Servers.
- Click the add sub-component button and choose Application Server.
- Fill in the fields as follows.
- Directory number: select a free telephone number within one of the number ranges owned by the CFS (see Note 1)
- Configured SIP Binding: select the binding that you created in the previous step
- Server type: select Recording and leave all the other values unselected
- Click apply to confirm your changes.
Info
The Directory number setting is rather critical. It is important to select a phone number that is treated as local in respect to the recorded users. Otherwise, if it is treated by routing rules as an external, then Metaswitch CFS may send SIPREC signaling packets through a SIP Trunk, which is wrong. This issue is easily detectable by looking at SIP messages call flow in SAS tool.
Step 5. Enable call recording service on MetaSphere CFS
Info
This step requires you to disable the global Application Servers object briefly in order to make configuration changes. This means that any other services provided to MetaSphere CFS by Application Servers will be unavailable for a short period, typically no more than five minutes. If you are running this MOP on a live system, you are recommended to do this step during a maintenance window or when call usage is low.
- In MetaView Explorer, navigate to Call Feature Server -> Call Services -> Application Servers.
- Click disable to disable the object so that you can modify it.
- Set Recording service support to Configured.
- Set Recording service - default subscribed setting and Recording service - default enabled setting according to the desired behavior.
- In Recording service - default server, select the Application Server that you added earlier in this procedure.
- Click apply to confirm your changes, then enable to re-enable the Application Servers object. Check that it becomes active and no alarms are shown.
Step 6. Enable recording individually for each user in Metaswitch CFS.
Info
This step is not required if you have enabled Call Recording on all lines by default.
You can use either MetaView Web or MetaView Explorer for this step. Repeat it for each line that you will use for testing Call Recording.
- If you are using MetaView Web:
- Search for the Business Group Line, MLHG (see Note 1), MADN or PBX DID Number using its directory number, or search for the PBX using its name.
- Go to the Configuration tab and expand the Advanced section to show the Recording Service fields.
- Ensure that the service is both subscribed and enabled, and that the server is set to the new server you added earlier in this procedure.
- Click apply to confirm your changes.
- If you are using MetaView Explorer:
- Use the Find option on the left-hand menu to find the line.
- Then find the Application Servers child object below it. For a PBX DID Number, the equivalent child object is DID Number Call Services.
- Ensure that the service is both subscribed and enabled, and that the server is set to the new server you added earlier in this procedure.
- Click apply to confirm your changes.
Info
According to the specifications, configuring recording on MLHG pilot number does not record all calls through it and whether a call is recorded depends solely on the configuration of the member who answers. However, the recording service on MLHG pilot does record calls sent to the pilot's voicemail.
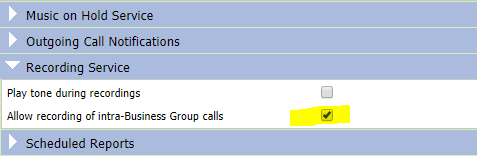
Step 7. Enable recording of intra-Business Group calls, if required
To record internal calls between subscribers within the same Business Group, enable the corresponding option in the Business Group settings:
Info
Caution! If recording of intra-Business Group calls is disabled, it may affect the consultative transfer scenarios as well. The transferred calls may not be recorded as they are treated as intra-business group calls in the Metaswitch phone platform.
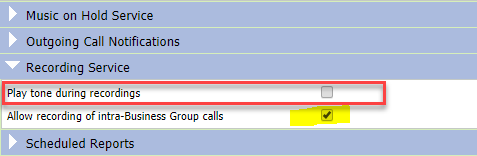
Step 8. Enable a recording announcement, if required
Metaswitch platform can generate a periodical beep tone when recording is enabled.
This option is configurable on Business Group level:
Step 9. Disable media bypass in Perimeta SBC for all recorded users
Subscribers behind Perimeta that have call recording enabled should not be allowed to use SBC media bypass, as this has been found to cause problems in the media path (one-way or no-audio issue for some call scenarios, including attended call transfer, hold/resume and 3-party conference). To disable it, on the adjacency facing the subscriber, type 'call-media-policy' and then 'media-bypass-policy forbid'.
Step 10. Create adjacency for MiaRec in Perimeta SBC
Note 1. This step is required only when you configured Perimeta SBC as a SIP Proxy in MiaRec's SIP Binding in the Step 3.
Note 2. When using two MiaRec servers in HA configuration (redundancy and auto-failover), check Configure SIPREC auto-failover for a CFS-Perimeta-MiaRec connection.
If SIPREC traffic is routed through Perimeta SBC, then you may face with no RTP issue. RTP packets are not delivered by SBC to MiaRec.
By default, the NAT auto-detect feature is enabled on the Perimeta SBC. SBC typically will wait for the endpoint to send RTP traffic before it will begin sending any of its own. Since MiaRec recorder is just a collection point, both ends would sit waiting for RTP.
Create adjacency for MiaRec in Perimeta SBC as in the following example (replace values in realm, service-address, signaling-peer and default-interop-profile attributes according to your SBC configuration).
adjacency sip MiaRecCallRecording
    adjacency-limits
      regs 0
      regs-rate sustain 0 per-second
    call-media-policy
      media-bypass-policy forbid
      repeat-sdp-on-200ok
    interop
      header-settings from rewrite host local port include
        # Effective value: host local port include
      preferred-transport tcp
      message-manipulation
        edit-profiles inbound ""
        edit-profiles outbound ""
    mandated-transport tcp
    adjacency-type preset-access
    privacy untrusted
    realm “Name associated with RTP Ports”
    service-address “Name associated with Service Network”
    signaling-local-port 5080
    signaling-peer “IP address or domain name of MiaRec”
    signaling-peer-port 5080
    statistics-setting detail
    default-interop-profile “Name of Blacklist Profile”
    deactivation-mode normal
    activate
Step 11. Make a test call and verify the recording
Make a call to or from one of the test lines on which Call Recording has been enabled. Check the recording on the MiaRec recording server.
If recording is not available, use MetaView Service Assurance Server to confirm that the call is being handled correctly
Detailed procedure:
- Log in to the MetaView Service Assurance Server Web GUI.
- Click Search.
- On the Number tab, enter the number of the Business Group Line to or from which you made the test call.
- Find the call that you made to or from the test number, and check the MetaView Service Assurance Server output to confirm that a SIP INVITE message was sent from MetaSphere CFS to the MiaRec recording server for this call.
Known limitations
SIP packets towards the MiaRec server are corrupted
Symptomps:
- MiaRec responses to the INVITE message with the error "400 BadRequest".
- The XML call metadata is not available in the received INVITE message on the MiaRec server side.
This issue may happen when SIPREC traffic is routed through a Cisco ISR router and port 5060 is chosen for SIPREC connection.
By default, Cisco ISR router activates SIP ALG helper for SIP traffic on port 5060. If you use that port, then router will modify SIP messages from Metaswitch CFS. Cisco ISR router doesn't support SIPREC protocol with a multipart body content and it simply removes SIPREC XML call metadata from the INVITE message by mistake. The simplest solution is to choose a non-standard port for SIPREC connection, for example, 5080. Cisco router activates SIP ALG only for traffic on port 5060. Alternatively, you can disable SIP ALG in Cisco ISR router.
Duplicate call recordings in particular call scenarios on Metaswitch CFS before 9.3.20_SU68
A duplicate of call recording issue may occur when call is answered on UC device (Mobility App, Desktop App, physical desk phone), then picked up on another device using the same line.
Fix: Upgrade the Metaswitch CFS server to version 9.3.20_SU68 or higher.